

How Do I Upload A Mp4 Audio/text Video To My Website
You lot can add media (such as video, audio, or an image) to a classic SharePoint page. The media file tin come from your estimator, from SharePoint, or from some other location such as a file share. You lot tin can embed a video from a video sharing website such as YouTube, Vimeo, or Hulu.
Warning:If you lot upload an audio file in the .WAV format, you might run into a message that is non correct for about browsers. The message states, "the Media Thespian Web Office cannot play files in this format." This is wrong for all supported browsers except Chrome. Ignore the message, and proceed to upload your file.
Important:Yous must have permission to edit pages to follow this process.
Insert video into a classic SharePoint, 2016, or 2013 folio
-
Go to the page where you desire to add together media.
-
Select the Folio tab. Then, on the ribbon, click Edit.
-
Click inside an editable expanse on the folio.
-
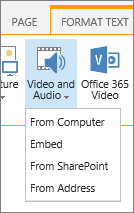
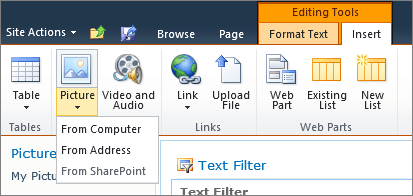
Choose the Insert tab, and in the Media group on the ribbon, click Video and Audio.
-
Yous'll see the following options:
-
From Computer
-
Embed
-
From SharePoint
-
From Address
For information about how to insert media with one of these options, click 1 of the following links.
-
To upload a file from your computer, follow these steps.
-
Click From Calculator.
-
Browse to the location of the file that you desire, select the file and and so click Open.
-
Specify a destination library where you desire to store the file.
Nosotros recommend that you specify an Asset Library as the destination. An Asset Library is designed especially for media, and automatically includes features such as image preview and thumbnails for videos. These features make it easier for you to work with your media files.
To learn how to prepare an Asset Library for media files, see Fix up an Asset library to store image, sound, or video files. -
Click OK.
To embed a video from a video-sharing website such as YouTube, Vimeo, Hulu, or similar sites, follow these basic steps.
On the Video site do this:
-
Bring up the video y'all want to use.
-
Notice and click Share for the video.
-
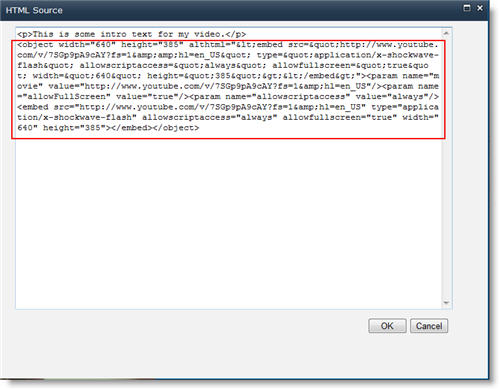
Depending on the site, you might have to click on an Embed link, or it might be right at that place. Click the embed code and press CTRL+C to re-create, or correct click and click Copy from the context menu.
Security Notation:For security reasons, SharePoint supports only embed code with an <iframe> tag.
On your SharePoint site practice this:
-
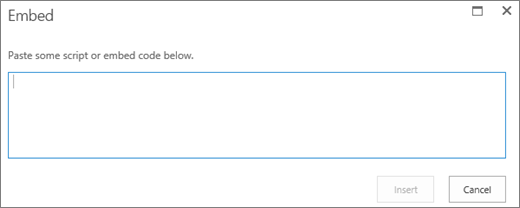
Click Embed.
-
Then, paste the embed lawmaking in the dialog box.
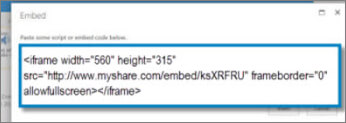
Tip:Typically, it is like shooting fish in a barrel to get the embed code for a video from popular video sharing sites. Simply expect for an Embed or Share option and then follow the onscreen instructions to display the embed lawmaking. When the embed code appears, copy it and so paste the code every bit shown in the preceding film.
-
Click Insert.
To add a video from a location on a SharePoint site, follow these steps.
-
Click From SharePoint. This opens the Asset Picker, which you lot can scan for the folder or library that you want.
-
Browse to a location on your site, such as an Avails Library, where video and audio files are saved.
-
Select the file that you want, and and then click Insert.
To add a video from another location on the web, follow these steps.
-
Click From Accost.
-
Type the URL for the file that yous want to use, so click OK. The URL must point directly to a video file. For case: http://contoso.com/VideoFile.wmv.
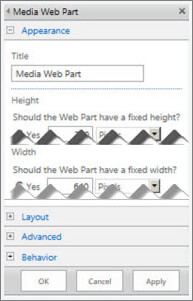
When you lot add video or audio to a folio, SharePoint inserts a Media Web Part. After you lot add together the media, you tin can customize the Web Part. For example, you might want to alter its size or location, edit the title, or add together a catalog logo.
Whenever you add a video to a page, brand certain to include captions and audio descriptions of the content. Captions let hearing-impaired users learn about the content, and they provide assist to non-native speakers who spotter the video.
If you want to change the Media Web Role on a page, follow these steps:
-
Go to the page that contains the video.
-
Select the Page tab, and and then click Edit.
-
When the video appears on the page, click anywhere on the video image to open up the Media tab and its ribbon.
-
On the ribbon, in the Preview group, point to Change Image and select the image file that you desire displayed as a preview for the audio or video file. If y'all do not update the preview epitome, the default image for the file type is displayed.
-
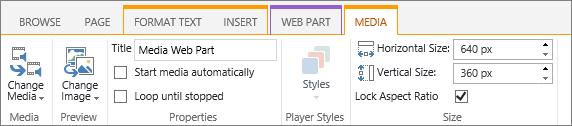
In the Backdrop group, you tin can enter or alter the title that appears. Yous can also specify whether you desire the file to play automatically when the folio is loaded, or if information technology should loop until stopped.
-
In the Player Styles group on the ribbon, indicate to Styles and select the style that you adopt for the histrion.
-
In the Size grouping on the ribbon, y'all can also cull to specify whatever changes that you want to make to the Horizontal and Vertical size of the role player.
-
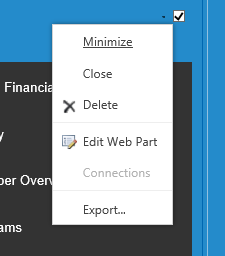
To edit the Media Web Part, hover the mouse on the media title then click the arrow that is displayed to open the Media Web Part Menu.
-
Choose Edit Web Office to open the edit window on the side of the screen.
-
In the Spider web Role edit panel, choose the properties that you lot want to change. When you cease making changes, click Use.
-
Click OK to shut the edit window and return to the page.
-
When yous finish making changes to the page, select the Folio tab, and and then click Salvage. If the folio is checked out to you, you see a alert message together with a link so you lot can cheque it in.
Here's how to place a much smaller, slimmer control bar into a webpage. This control bar works all-time for audio files, like podcasts, in which the full media spider web part would be as well large.
-
Upload the audio file and transcript file into your Site assets folder.
-
To open up the Settings carte, in the upper-right corner, select Settings .
-
Select the Site Contents link.
-
Become to the Site Avails folder.
-
Drag the audio and transcript file into the folder.
-
Get the URLs for the files. To open the file activeness carte du jour, adjacent to the file name, select the ellipsis. Re-create and paste the link from the action menu to another file. You will demand this link afterwards, in the sound embed lawmaking.
-
-
To open the Editing ribbon and to enter Edit mode, on the page where you want to display the video, select the Edit link.
-
Place the focus where you want the video to appear.
-
To open the Embed dialog box, from the Insert tab, open up the Video and Sound group and select Embed.
-
Paste the embed code into the field, with the URL of your sound file after "src=" and between the quotation marks.
<audio src="your-audio-file-URL-here.mp3"controls="controls"></audio>
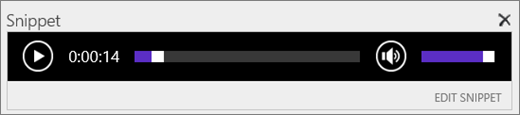
This code places the media control bar on the page. The bar lets users starting time and stop the playback.
Tip:If your embed code is non formatted correctly or if it points to a file location that does not be, the Insert push will non be agile.
-
When you are done, select Insert to put your audio control on the folio. The embedded sound control looks similar this:
-
Place the focus at the end of the sound control snippet and to go to the next line, printing Enter.
-
Insert a link to your audio transcript file.
-
To open the Select an Asset dialog box, from the Insert tab, select Link and From SharePoint.
-
Select your sound transcript file, and printing Insert. This inserts a hyperlink with the proper noun of the file as the text of the link.
-
Place the focus in the link, just before the last character of the file name. Slowly backspace to remove all merely the get-go and last characters in the file name.
Tip:This leaves the link intact and keeps your cursor exactly where it needs to be and then that you tin change the text of the link.
-
Blazon the text that you want for the link. For instance, for an sound transcript, type View the audio transcript.
-
Delete the remaining characters of the file proper name.
-
-
When you're done, to save all your changes, at the top of the page, click Salve.
When using photos, images, clip art, or audio, you're responsible for respecting copyright.
-
To open the Editing ribbon and to enter Edit way, on the page you want to edit, select the Edit link.
-
Identify the focus where yous want the picture to announced.
-
To open the Upload Paradigm dialog box, from the Insert tab, open up the Picture group and select From Computer.
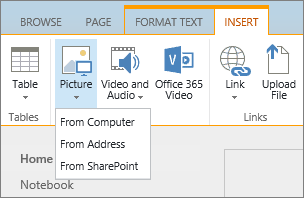
Tip:To insert a picture from the Cyberspace past pasting in an prototype URL, select From Address. To insert an prototype from your SharePoint site, select From SharePoint.
-
Cull your file, select a destination folder in your SharePoint site (the default option is the Site Assets binder), and include whatsoever notes about the dissimilar epitome version.
-
To insert your motion-picture show and activate the Paradigm tab, select OK.

Tip:The Epitome tab is only visible when an image is selected.
-
Move to the Alt Text box on the Paradigm tab, and enter your alternative text for the image.
-
When you finish, click Salvage.
Accessibility tips
-
Alt text should be cursory but descriptive.
-
Good alt text tells the listener why the picture is important.
For more than data about alt text, including examples and links to more information, visit the WebAIM Alternative Text page.
Add together the Media Web Part to a page
Yous tin can use the Media Web Role to play audio or video clips on a page. For data about the specific video and sound formats supported by the Media Web Part, encounter Supported Media Formats and Protocols in Silverlight.
Yous must have permission to edit pages to follow this procedure.
-
Go to the page you desire to update.
-
On the Folio tab of the ribbon, click Edit.
-
Exercise one of the following:
-
If yous are editing a wiki page or a publishing page, click an editable location on the page where you desire to add the Media Web Role, click the Insert tab under Editing Tools on the ribbon, and and so click Video and Sound.
-
If you are editing a Web Part page, click Add a Spider web Role in the cavalcade or zone you where you want to embed media. Under Categories, click Media and Content. Nether Web Parts, click Media Spider web Part, and and then click Add together.
-
-
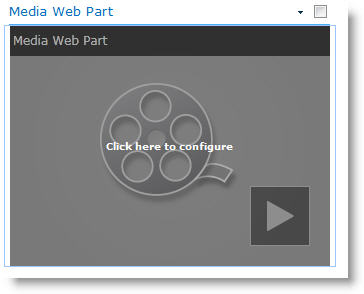
When the Media Web Part appears on the page, click the text that states Click here to configure.
-
Click the Media Options tab on the ribbon.
-
To configure the Media Spider web Role to brandish a specific audio or video file, point to Change Media, and and then select 1 of the following:
-
To upload a file from your reckoner, click From Computer, browse to the location of the file yous want, so click OK.
-
To embed a video that is already saved to a SharePoint site, click From SharePoint, and then and then browse to a location on your site, such equally an Assets Library, where video and audio files are saved. Select the file that you want, and and then click OK.
-
To embed a video from a video-sharing website, click From Accost, and and so type the URL for the file you want to utilize, and then click OK.
The Media Web Part supports playing files from URL addresses that betoken directly to a video file. For case: http://contoso.com/VideoFile.wmv. If you use embed code or sharing links for pages that host video, they will not work. For information about embedding videos using embed lawmaking, see Embed a video on a page using embed code.
-
-
When y'all've selected the file you want, click OK.
-
In the Preview group, point to Change Image, and select the image file you would like to display every bit a preview for the sound or video file. If yous do not update the preview paradigm, the default image for the file type will be displayed.
-
In the Properties group, specify the title you want to brandish for the Web part. You lot can as well specify whether you want the file to play automatically when the folio is loaded, or if it should loop until stopped.
-
In the Player Styles group on the ribbon, point to Styles and select the style y'all adopt for the histrion.
-
In the Size group on the ribbon, you lot can optionally specify any changes you desire to brand to the Horizontal and Vertical size of the thespian.
You tin can employ the Content Query Web Role to add a dynamic display of video or sound files to a page. This is useful if you want to add a section to your page that features "top rated" videos, or all videos with a specific metadata tag.
When you add a Content Query Web Part to a page, yous can configure it to query for all content items on a site that run across specific criteria. It and then displays the results of that query on the page. If new content is added to the site and it meets the criteria for the query, it will too be displayed in the Web Part. The Content Query Web Part can return content from an individual list or library, or from multiple lists and libraries across a site collection.
Yous must have permission to edit pages to follow this procedure.
This procedure assumes you want to brandish videos, but it will too work for Audio or Image files.
-
Go to the folio y'all desire to update.
-
On the page tab of the ribbon, click Edit. Exercise 1 of the following:
-
If you are editing a wiki folio or a publishing page, click an editable area of the page where you want to add together the Content Query Web Part. Click the Insert tab of the Editing Tools ribbon, and then click Spider web Role. Under Categories, click Content Rollup. Under Web Parts, click Content Query, and then click Add.
-
If you are editing a Spider web Part page, click Add a Web Office in the column or zone you where you want to add the Content Query Web Part. Under Categories, click Content Rollup. Under Web Parts, click Content Query, and and so click Add together.
-
-
In the Content Query Web Part, click the arrow, and then click Edit Spider web Part.
-
Click the open the tool pane link.
-
In the Content Query tool pane, click to expand Query.
-
Under Source, specify the location for the items you would like to bear witness. If necessary, browse to the location of the specific site, subsite, or list.
-
If you lot scoped your query to site, nether Listing Type, specify the type of list from which you want to prove items. If y'all selected a specific list or library in step 6, then this field volition be automatically populated for you.
-
Under Content Type, under Show items of this content type grouping select Digital Asset Content Types.
-
Under Show items of this content type, select Video. If your organization has created customized versions of the digital asset content types, yous may also want to select the Include child content types check box.
-
Optionally, under Audience Targeting, you tin can opt to apply audience filtering, which will display certain items to sure audiences, depending on how Audience targeting is configured for your site.
-
Under Additional Filters, you can use item metadata to filter what is displayed. For example, if you want to bear witness videos that take been tagged with a specific keyword, select Enterprise Keywords with the operator contains any of, and and then type the values you desire.
-
If yous want to add more filters, click And or Or and specify boosted filters.
-
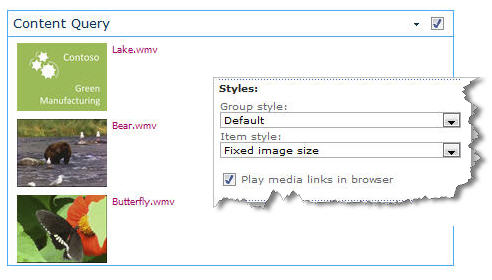
Expand Presentation, make whatever customizations that you want under Group and Sorting, Styles, and Fields to display. Under Styles, information technology is useful to make sure the Play media links in browser cheque box is selected if you desire site visitors to be able to play media clips directly in the browser.
When you initially configure the Content Query Spider web Part, you may not know how you want to configure the items under Presentation. Information technology might exist helpful to first preview your query in the Web Part and so edit information technology again to make customizations to the appearance of the information.
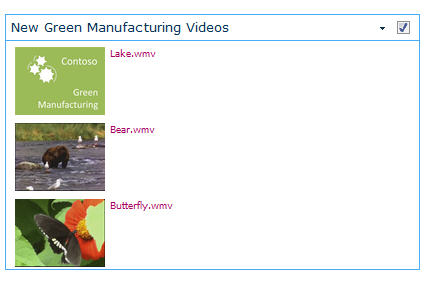
For example, if you do not customize any of the settings nether Presentation, videos may display with a big preview prototype, which might not piece of work with the pattern of the page. In that instance, you might desire to select Fixed paradigm size under Styles | Detail style to provide site visitors with small preview images they can click in guild to play videos. The following example shows a Content Query Web Part that is displaying 3 videos. It has been configured with a fixed image size.
-
Click OK.
-
Save your changes to the page.
For more information about the Content Query Web Part, see Display a dynamic view of content on a folio by calculation the Content Query Web Part.
If yous want to employ embed code from a 3rd-party video-sharing website to add a video to a page, you tin do so by adding the embed code to the Content Editor Web Part.
You must take Designer permissions to follow this procedure.
-
Locate the video that yous want to embed on the page, and copy the embed code.
-
Go to the page you want to update.
-
On the Page tab of the ribbon, click Edit. Do i of the following:
-
If you are editing a wiki folio, click a location on the page where you lot desire to add the Content Editor Spider web Office, click the Insert tab of the Editing Tools ribbon, and and so click Web Part. Under Categories, click Media and Content. Under Spider web Parts, click Content Editor, and then click Add.
-
If y'all are editing a Web Part folio, click Add a Web Part in the column or zone yous where you desire to embed media. Under Categories, click Media and Content. Nether Spider web Parts, click Content Editor, and so click Add.
-
-
In the Content Editor Web Role, point to the pointer, and click Edit Web Part.
-
In the Content Editor Web Part, type any text you want to display to innovate the video.
-
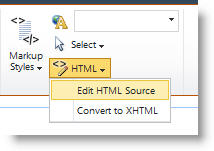
On the Format Text tab of the Editing Tools ribbon, in the Markup group, click HTML, and then click Edit HTML Source.
-
Paste the embed code into the HTML Source dialog box, and so click OK.
-
Save the page (or save and check in, if checkout is required for pages on the site).
-
Click the play push button on the embedded video player to play the video.
Adding images with Alt text
To make your content accessible to all users, follow these guidelines.
When using photos, images, clip fine art, or audio, you're responsible for respecting copyright.
-
To open up the Editing ribbon and to enter Edit mode, on the folio y'all desire to edit, select the Edit link.
-
Identify the focus where you lot want the pic to appear.
-
To add an image, from the Insert tab, open the Picture group and select From Computer.
Tip:To insert a picture from the Internet by pasting in an image URL, select From Address. To insert an image from your SharePoint site, select From SharePoint.
-
Choose your file, select a destination folder in your SharePoint site (the default option is the Site Assets folder), and include any notes most the different image version.
-
To insert your picture and activate the Picture Tools tab, select OK.

Tip:The Picture Tools tab is but visible when an prototype is selected.
-
Motility to the Alt Text box on the Image tab, and enter your alternative text for the image.
-
When you finish, click Save.
Accessibility tips
-
Alt text should be brief but descriptive.
-
Good alt text tells the listener why the film is of import.
For more information virtually alt text, including examples and links to more information, visit the WebAIM Alternative Text page.
Supported Video Formats
The Media Spider web Part uses HTML5 video and supports .asf, .avi, .mpg, .mp3, .mp4, .ogg, .ogv, .webm, .wma, and .wmv video formats.
The archetype Silverlight Media Spider web Part supports .asf, .mp3, .mp4, .wma, and .wmv.
Note: While all the higher up formats are supported, non all of them are attainable out of the box (for case, .wmv). Delight utilise the .mp4 format for the about accessible solution.

How Do I Upload A Mp4 Audio/text Video To My Website,
Source: https://support.microsoft.com/en-us/office/add-video-audio-or-images-to-a-classic-page-b5220c61-e56a-40fd-8754-d06a2e38b492
Posted by: jacobsallecte.blogspot.com
0 Response to "How Do I Upload A Mp4 Audio/text Video To My Website"
Post a Comment